Next.js Pages to App Router - Full Migration Guide
Sep 21, 2023 by Florian

A few months ago, the app router became stable in Next.js. The app router is a new way of building your Next.js apps and it replaces the old pages directory. Not only do you put your website's pages and other files into a new folder (called "app"), but almost everything works completely differently than before.
The app router is built around React Server Components. You will learn what exactly they are later in this post.
When I first made my Next.js with Express and TypeScript course, the app router was still in beta. I also knew that, even after it became stable, the app router would still have bugs and missing features for probably a few months. This is why I built the course around the "old" pages directory first. I wanted to use stable technology that has been battle-tested for years.
Now that the app router has been stable for a few months and most major bugs have been eliminated, I updated my course with a new ~3h-long section where we migrate the whole project from the pages directory to the new app router. Of course, this update is free for everyone who already bought the course.
In hindsight, I really like this approach. The pages router is still relevant. Lots of legacy code is using it and some people even prefer using it for new projects. Vercel already confirmed that the pages directory will be supported for at least several years. By building a project in the pages directory first, as we do in the course, and then migrating it to the app router, you really understand both approaches and how they relate to each other. I think this makes my course even more valuable and I'm very proud of how it turned out.
I spent the last few months really studying the app router in detail and building different projects with it. I feel confident that I understand how it's supposed to be used correctly. Things like caching and request deduplication can be a bit hard to understand when you start using the app router. But my course and my YouTube tutorials will explain everything you need to know.
In this post, I want to go through the steps necessary to migrate your Next.js project from the pages directory to the new app router. This guide can act as an instruction manual if you're planning to convert your own project. There is also a video version of this post that you can watch here.
If you want to see the exact code changes of the whole migration, check out this GitHub branch comparison.
Good to know: The pages router and the app router are interoperable. You can just add an app/ folder to your existing project and start putting pages in there. Everything in the pages folder will still work. The only things to keep in mind are that a route can only exist once, either in the app folder or in the pages folder. And when you navigate between a page in the pages folder and a page in the app folder, it navigates like a normal <a> link, with a hard reload, rather than smoothly like a next/Link that maintains all your state.
Now, let's go through each migration step one by one:
Table of Contents
- Step 1: Create an app folder
- Step 2: Create a root layout
- Step 3: Create your pages
- Step 4: Extract client component "islands"
- Step 5: Replace all usages of useRouter
- Step 6: Replace all <Head> tags
- Step 7: Set up other "special files"
- Step 8: Replace your API route handlers
- What about context providers?
- Using React-Bootstrap and other component libraries inside server components
Step 1: Create an app folder
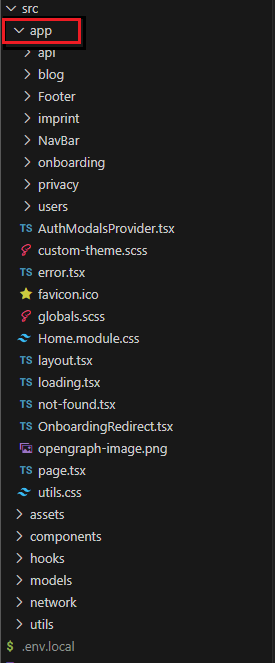
To start your app router migration, create a new folder called "app" (the name has to be exact) in your project's root directory (or in src, if you use that folder).
In here you will put all your pages, API routes, and certain special files (more on that in a moment). It's important to note that the app router allows you to colocate any file type with your page files. You can put your CSS files in here, context providers, components, and really anything else you want. But you don't have to, you can also put them outside of the app folder if you prefer.
Step 2: Create a root layout
import "./globals.scss";
import "./utils.css";
import { Container } from "@/components/bootstrap";
import { Metadata } from "next";
import { Inter } from "next/font/google";
import AuthModalsProvider from "./AuthModalsProvider";
import Footer from "./Footer/Footer";
import NavBar from "./NavBar/NavBar";

const inter = Inter({ subsets: ["latin"] });

export const metadata: Metadata = {
  title: "Flow Blog - Share your ideas",
  description: "A full-stack NextJS course project by Coding in Flow",
  twitter: {
    card: "summary_large_image",
  },
};

export default function RootLayout({
  children,
}: {
  children: React.ReactNode;
}) {
  return (
    <html lang="en">
      <body className={inter.className}>
        <AuthModalsProvider>
          <NavBar />
          <main>
            <Container className="py-4">{children}</Container>
          </main>
          <Footer />
        </AuthModalsProvider>
      </body>
    </html>
  );
}
Put a file called layout.tsx directly into your app folder (don't nest it inside another folder). This is your root layout.
The root layout replaces your _app.tsx and _document.tsx files. Here you put components that should be shared across all pages of your app, like a navbar and a footer. You also put context providers that should wrap your whole application here.
It's important that you add the <html> and <body> tags to this root layout because Next.js doesn't do this for you. The layout also takes a children prop, which are the different pages of your app. Don't worry about export const metadata for now, I will explain that further down below.
You can also create nested layouts. For this, create another layout.tsx inside the folder of a route (more on that in a moment). Then this nested layout will be wrapped into your app layout and only be shown on these sub-pages. You can repeat this as much as you want for more deeply nested routes.
Step 3: Create your pages
To create a new page in the Next.js 13 app router, you have to add a page.tsx file to your app folder. Attention: Every page has to be called page.tsx now! The name must not be different. If you want to create a nested route (a relative URL like /blog), you have to create put your page.tsx into subfolders. If you need a dynamic URL param, you always put that into the folder name now (inside square brackets).
For example, the following creates a page at /blog/[slug], where [slug] can be anything:
You can receive the dynamic param via the page's props as shown below. If you need search params (the ones you pass in the URL after a question mark), you can add a similar prop called searchParams that contains the values you expect.
export async function generateStaticParams() {
    const slugs = await BlogApi.getAllBlogPostSlugs();
    return slugs.map((slug) => ({ slug }));
}

export default async function BlogPostPage({ params: { slug } }: BlogPostPageProps) {

    const {
        _id,
        title,
        summary,
        body,
        featuredImageUrl,
        author,
        createdAt,
        updatedAt,
    } = await getPost(slug);

    [...]
What are React Server Components?
You might be surprised that the component above is an async function. This is possible because, by default, all components in the Next.js 13 app router are server components.
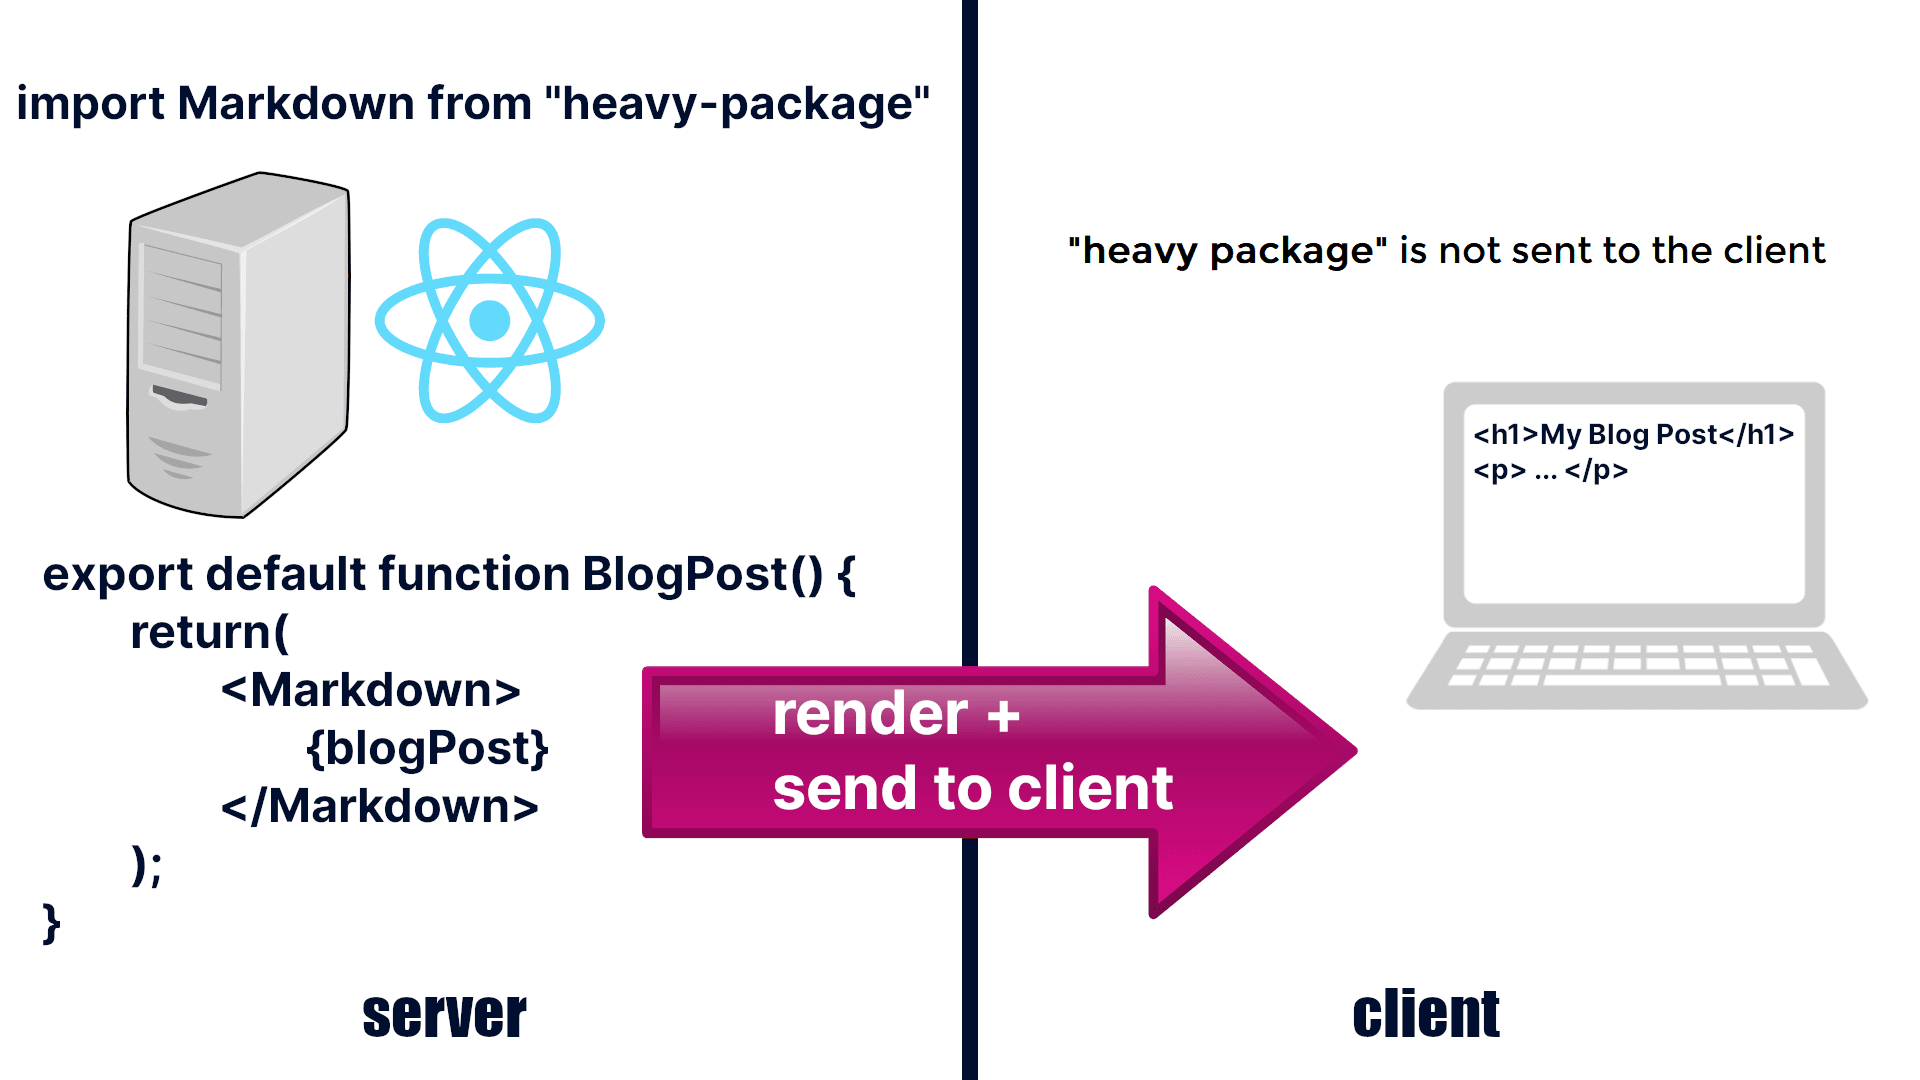
Server components are a new feature in React. As the name implies, they are rendered on the server. They replace getStaticProps and getServerSideProps in the pages directory. Instead of exporting these functions, you simply make your component async and fetch the data directly in the function body.
Imagine server components as a simpler but at the same time more powerful version of getStaticProps/getServerSideProps. They send less JavaScript to the client because the dependencies you use to render the page are only executed on the server, resulting in a smaller bundle size and faster page loads.
Server components also support new features like streaming, which allows you to load certain parts of the page from the server later and show a loading indicator instead, similar to what you do when fetching data client-side.
As far as I know, Next.js is the only React framework that implements server components right now and makes them available for adoption.
Static/dynamic caching
In the pages directory, we had to decide between getStaticProps, which fetches data at compile-time and then caches the page across requests, and getServerSideProps, which fetches fresh data every time a user opens the page. But now these functions aren't available anymore.
In the app router, there are two ways of deciding the caching behavior.
If you're using the fetch function, you can set the caching strategy in the configuration argument. Static caching (meaning the page is only rendered at compile time) is the default. If you want to fetch new data with every request (like getServerSideProps does), set the cache option to either "no-cache" or "no-store" (they do the same thing):
export default async function BlogPostPage({ params: { slug } }: BlogPostPageProps) {

    const post = await fetch(`https://mybackend/api/blog/posts/{slug}`, {
        cache: "no-store" / "no-cache"
    });

    [...]
However, this only works when you use fetch. If you use something like Axios, GraphQL, or an ORM (like Prisma), then you have to use a route segment config instead, which sets the caching behavior for the whole page. By exporting const dynamic = "force-dynamic", we opt out of static caching for this page:
export const dynamic = "force-dynamic";

export default async function BlogPostPage({ params: { slug } }: BlogPostPageProps) {

  const post = await axios.get(`https://mybackend/api/blog/posts/{slug}`);

  [...]
However, often you don't even need to configure the caching behavior manually because Next.js is intelligent about it. Certain things, like using dynamic searchParams on a page, will automatically make your page dynamically cached. You can see how pages are rendered and cached in the build output when you compile your project. This will help you configure the behavior you want for each page:
Note: For some reason, the log still says "getServerSideProps" and "getStaticProps" even though it's using server components here.
The generateStaticParams function you saw in the code earlier replaces getStaticPaths from the pages router. Those are the dynamic routes we want to cache at compile-time. The return value has been simplified and is now just a JavaScript object with the dynamic parameter inside.
Step 4: Extract client component "islands"
Server components are great for loading speed, but they don't allow for any interactivity. You can't use state, effects, event listeners (like onClick), context, hooks, or client APIs like local storage inside a server component. They can pretty much only render a static page.
Whenever you need any of the features above, you have to make your component a client component. To create a client component, add a string containing "use client" to the top of a file:
"use client";

import { Comment as CommentModel } from "@/models/comment";
import * as BlogApi from "@/network/api/blog";
import { useCallback, useEffect, useState } from "react";
import { Button, Spinner } from "react-bootstrap";
import CommentThread from "./CommentThread";
import CreateCommentBox from "./CreateCommentBox";

interface BlogCommentSectionProps {
    blogPostId: string,
}

export default function BlogCommentSection({ blogPostId }: BlogCommentSectionProps) {
    return (
        <CommentSection blogPostId={blogPostId} key={blogPostId} />
    );
}
You can only put this "use client" directive at the top of a file, not within a file. This means that you need to extract your client components into separate files. It's a good strategy to turn only the parts that need client-side features into client components and keep the rest server-side rendered. In the following code snippet, EditPostButton and BlogCommentSection are two client components nested inside a server component page:
export default async function BlogPostPage({ params: { slug } }: BlogPostPageProps) {

    const { ... } = await getPost(slug);

    [...]

    return (
        <div className={styles.container}>
            <EditPostButton authorId={author._id} slug={slug} /> // Client component

            [...]

            <article>
                [...]
                <Markdown>{body}</Markdown>
            </article>
            <hr />
            <BlogCommentSection blogPostId={_id} /> // Client component
        </div>
    );
}
Every component you render inside a client component automatically turns into a client component too. You don't have to repeat "use client" in every single component, you only need it once at the top of this client-side section of your component tree.
It's important to note that in the pages directory, all components are effectively "client components". Client components are still pre-rendered on the server in Next.js so there is no reason to avoid them. They still perform really well when it comes to SEO. Server components just load a bit faster.
Step 5: Replace all usages of useRouter
The useRouter function imported from next/router doesn't work in the app directory anymore. Instead, you have to import useRouter from next/navigation. To retrieve the pathname (the relative URL you're currently on) or the search params, you now have to use two new separate hooks: usePathname and useSearchParams.
import { useRouter, usePathname, useSearchParams } from "next/navigation";
import { Button } from "react-bootstrap";
import { FcGoogle } from "react-icons/fc";

export default function GoogleSignInButton() {
  const useRouter = useRouter();
  const pathname = usePathname();
  const searchParams = useSearchParams();

  return (
    <Button
      href={
        process.env.NEXT_PUBLIC_BACKEND_URL +
        "/users/login/google?returnTo=" +
        encodeURIComponent(
          pathname + (searchParams?.size ? "?" + searchParams : "")
        )
      }
      variant="light"
      className="d-flex align-items-center justify-content-center gap-1"
    >
      <FcGoogle size={20} />
      Sign in with Google
    </Button>
  );
}
Step 6: Replace all <Head> tags
In the root layout in step 2, you could already see how metadata is set in Next.js: The <Head> tag doesn't exist anymore. Instead, we export a const called metadata from a layout or a page. Here you can set the page title, description, and things like the social media preview for your website.
By setting metadata directly in the root layout, this metadata will be used across all your pages. You can set more specific metadata on single pages and nested layouts. The root metadata will then serve as the fallback.
Also, if you look at the code in step 1 where I showed the app folder, you will notice a file called opengraph-image.png in there. That's your default og:image. Next.js will automatically use it as the social media preview image for your website. The file has to have this exact name and be placed directly in the app folder in order for Next.js to pick it up. Your site's favicon also goes directly into the app folder.
If you need dynamic metadata that depends on data coming from your database or another external source, you can export generateMetadata from a page instead. Here you can fetch data asynchronously just like in a server component. If you use fetch, requests to the same endpoint are automatically deduplicated within the same render cycle, meaning you make only one request, even if you call fetch with the same URL in multiple places. If you don't use fetch, you have to wrap your data request into React's new cache function to avoid duplicate requests. I explain this in more detail in my tutorials.
// React's cache function deduplicates the request between the page component and generateMetadata
const getPost = cache(async function (slug: string) {
  try {
    return await BlogApi.getBlogPostBySlug(slug);
  } catch (error) {
    if (error instanceof NotFoundError) {
      notFound();
    } else {
      throw error;
    }
  }
});

export async function generateMetadata({
  params: { slug },
}: BlogPostPageProps): Promise<Metadata> {
  const blogPost = await getPost(slug);

  return {
    title: `${blogPost.title} - Flow Blog`,
    description: blogPost.summary,
    openGraph: {
      images: [{ url: blogPost.featuredImageUrl }],
    },
  };
}

export default async function BlogPostPage({ params: { slug } }: BlogPostPageProps) {

    const blogPost = await getPost(slug);

    [...]
Step 7: Set up other "special files"
In the code in step 1, you will notice more files that have special names. Here are the explanations for each of them:
loading.tsx is how you show a loading indicator when you navigate between pages in the Next.js app router. Internally, this uses React's new suspense boundaries (which you don't have to understand in order to use Next.js).
error.tsx replaces 500.tsx in the pages directory.
not-found.tsx replaces 404.tsx.
To see the content of these files, check out the repository on GitHub.
Note: Just like for layout.tsx, you can create nested versions of these files in your route folders.
Step 8: Replace your API route handlers
If you had API endpoint handlers in your /pages/api/ folder, they now have to move into the app folder as well. You actually don't have to put them into an api/ folder anymore, but it's a good practice.
These files have to be called route.ts. Again, dynamic URL params go into the folder structure now.
Instead of a single handler function, we can now export separate handler functions for GET, POST, PATCH, etc. requests:
import { revalidateTag } from "next/cache";
import { NextResponse } from "next/server";

export async function GET(
  req: Request,
  { params: { slug } }: { params: { slug: string } }
) {
  try {
    const { searchParams } = new URL(req.url);
    const secret = searchParams.get("secret");

    if (!secret || secret !== process.env.POST_REVALIDATION_KEY) {
      return NextResponse.json(
        { error: "Invalid revalidation key" },
        { status: 401 }
      );
    }

    console.log("Revalidating tag: " + slug);

    revalidateTag(slug);

    return NextResponse.json(
      { message: "Revalidation successful" },
      { status: 200 }
    );
  } catch (error) {
    return NextResponse.json({ error: "Error revalidating" }, { status: 500 });
  }
}

export async function POST(
    ...
)
In the code above, we use revalidateTag to do on-demand revalidation of a statically cached page. More on that in my course.
What about context providers?
Earlier I explained that whatever component you put into a client component, also turns into a client component. This is necessary because all server components get rendered before all client components.
So you can't do something like this:
"use client";

export default function ClientComponent() {
  return (
    <div>
      <ServerComponent />
    </div>
  );
}
where ServerComponent is an async function. This will throw an error.
However, there is one exception to this rule. If you use the children prop inside a client component, it can still render a server component in place of children. This is possible because React doesn't have to know in advance what you place inside children, and so it can still prerender this content on the server.
This is very important because it allows you to still wrap all your pages into context providers, without rendering all pages as client components. For example, look at the root layout in step 1 again. The AuthModalsProvider wraps all our pages. But since it uses the children prop, whatever we put between the tags of AuthModalsProvider can still be a server component:
"use client";

[...]

export default function AuthModalsProvider({ children }: AuthModalsProviderProps) {
    [...]

    return (
        <AuthModalsContext.Provider value={value}>
            {children}
            {showLoginModal && ... }
            [...]
        </AuthModalsContext.Provider>
    );
}
Of course, the context will only be available in client components (since you can't use any hooks inside server components).
Using React-Bootstrap and other component libraries inside server components
Many component libraries, like React-Bootstrap, use client component features (like context) internally. The problem is, these components don't yet declare the "use client" directive in their own source code and hence you can't use them inside server components.
But there is an easy fix to this issue. Simply re-export these third-party components from your own tsx file where you add the "use client" directive at the top. If you need to access a subcomponent via dot notation, you have to export it under a new name, otherwise, you'll get an error that says "you cannot dot into a client module from a server component":
"use client";

import { Card } from "react-bootstrap";

// Dot-notation doesn't work with this approach so we export sub-components under new names
export const CardBody = Card.Body;
export const CardTitle = Card.Title;
export const CardText = Card.Text;

export {
  Row,
  Col,
  Container,
  Spinner,
  OverlayTrigger,
  Tooltip,
  Card,
} from "react-bootstrap";
Those were all the major steps necessary to migrate your Next.js 13 project from the pages directory to the new app folder.
Overall, the code in the app router has been simplified compared to the pages directory. We don't have to send data between getStaticProps/getServerSideProps and our pages anymore and the caching behavior is handled more implicitly and often automatically. However, this also makes the app router a bit trickier to use at times and harder to understand for beginners.
Unfortunately, some features that we had in the pages directory, like router events, are not available in the app directory anymore. This is why I think it's good to know how to use both directories.
Again, check out my Next.js with Express and TypeScript course to see the full migration step by step. It will help you really understand the ins and outs of both the pages and the app router.
See you in the next post and happy coding!
Florian
Tip: I send regular high-quality web development content to my free email newsletter. It's a great way to improve your skills and stay ahead of the curve.
Subscribe Now


![A Next.js project folder tree showing a page.tsx inside app/blog/[slug]/](/_next/image?url=%2Fblog%2Fnextjs-13-pages-to-app-router-migration%2Fdynamic-route-page.png&w=640&q=75)


